Thursday, August 24, 2017

Setup Python 3.6.2 Virtual Environment For Trade + Machine Learning Setup| Windows 10 Sublime Text 3

00:00 - 01:20 | Install Python
01:27 - 02:02 | Install virtualenv to system Python
02:06 - 03:02 | Create virtual environment
03:13 - 03:58 | Download Sublime Text 3
04:02 - 06:28 | Setup Sublime Text 3 Python path
06:29 - 07:31 | Setup Sublime Texxt 3 layout
07:38 - 08:36 | Install Python packages for trade
08:37 - 09:56 | Example reading stock data


Part 1

Part1

In this video
I'll be showing how to setup Python on Windows 10

Look up for the Python installation from your browser
and install the one that fits your system

Here I'm downloading the 64-bit Windows version

Save it to your download folder
and double click to install

Untick things that are not needed
and custom install to the drive you want

Untick the optional features
and set the destination folder

In this case
I'll be installing Python to F drive folder "py362"

Hit "OK" and start installation

You can now remove the Python installer

Now we're going to install virtualenv

Open command prompt

Navigate to the system Python location
which is F:\py362\Scripts

from there
we pip install virtualenv

Hit [Enter]
and wait for the process

you can type pip list to check whether virtualenv is installed to the system

Part 2

We're now creating a folder in F drive to hold our virtual environment

Go to command prompt
Go to F drive and type md space "Trade"
We'll be using this folder to hold our Python trade projects

Part 3

Open a new command prompt

and navigate to our system Python location
which is F:\py362\Scripts

hit [Enter] and install a new virtual environment
to the path
F:\Trade\TradeEnv
then hit [Enter] to start installation

Exit command prompt
and go to the path to see whether the virtual environment is installed

Jump back to browser
and download Sublime Text 3
Click to download the one that fits your system

Once it's downloaded
extract all files
then cut and paste the Sublime Text folder
to your destination folder

Open up the Sublime Text folder
and doubleclick the execute file to start programming

Let's start typing some Python code
Save it as a Python file

Before you run the code
you go to Tools -> Build System and tick Python

But when you hit [Ctrl] [B] to run the code
you get error message

That's why we need to create new build
to point to our virtual environment

From the untitled sublime build file
we need to paste some codes

We can look up for these codes from web

Before we save
we need to change the "python" path
to our virtual environment

I just name it with my environment's name
so that I can easily remember

Go back to your Python file
and tick the Sublime build we've just created
and run the Python code to check if it works

Yeah! It works

Part 4

If you want to move the output panel
from bottom to right

simply hit [Ctrl], [Shift], [P]
and type "install package"

Hit [Ctrl], [Shift], [P] again
and type "install"
Hit it and you'll be able to type "buildview"

click the only selection
and wait for the installation

Now you can hit [Alt] [Shift] [2]
and see a split in between

Simply run the code again
and drag the result panel
to the right

Then you can now see the right side
displays the code result

Now
we're going to pip install several packages for trade

Open command prompt

Navigate to the virtual environment's Scripts folder
pip install pandas
This is a popular package to read and process data

We then pip install xlrd
to let us read and write Excel file with Python

Pip install matplotlib
We use this one to plot graph

We also need beautifulsoup 4 to grab web data

exit command prompt

I'm going to create a new Python file to test these packages
Before saving, make sure you're coding in the virtual environment

Save the file

We're going to read this csv file with Python packages

Let me type and run the code

Ooops I type the wrong file format excel instead of csv

Go back to change to csv in our code
and press [Ctrl] [B] to run it

There we go!

Thanks for watching


Please note that you can also install numpy + mkl, scipy, and sklearn for machine learning


Feel free to discuss trade algo at
www.facebook.com/clueple

Monday, August 21, 2017

Setup Sublime Text 3 To Use Python Virtualenv on Windows

Using Virtualenv in Sublime Text 3 (Windows)


I was just looking for this setup for long.
Finally, found that pointing the path in the Sublime Text 3 build file (video 05:14 - 08:07)
can make it work.

The reason why I setup virtual environment because I need to separate different projects
based on purposes.

In this video, I pip install 2 packages - pandas and xlrd - to my virtual environment "myTradeEnv" to read the stock data from a csv file.

When you're in Sublime Text, type your Python code and save as a new Python file.
Then you go to Tools -> new build system and paste your code there.

Once you save that Sublime Text build file, get back to your Python file
and hit [Ctrl] + [B] (build) to run your code.


00:00 - 01:23 | Download and install Python
01:23 - 03:01| install virtualenv to system
03:19 - 04:09| create virtual environment myTradeEnv
04:22 - 05:11| download sublime text 3
05:14 - 08:07| setup sublime text 3 to run Python virtual environment
08:10 - 11:10 | test running python code in virtual environment to grab stock data from a csv file

Monday, August 7, 2017

Running Python On USB | WinPython

Just tried using Python on USB via WinPython.
It's pretty handy.

Simply double-click the WinPython execute file downloaded from its official website.
And you'll see a zip folder.
Unzip it to wherever you want (in my case, a USB stick).

You're ready to code.

Simply double-click the icon "Spyder" to open up the code editor.


Wednesday, August 2, 2017

Try Loading Video Source With OpenCV in Python Virtual Environment

I tried out the New Boston's OpenCV script to load up a video source.

I could get the video feed when only loading the webcam but not the capture card being hooked up to my laptop.

I did get the choice to select video source.  But still, couldn't get it worked.

If you know how to grab the video source to play on PC, please let me know.

Many thanks.


Monday, July 31, 2017

Get Started In Video Editing In 22 Minutes

What You Need To Know For Video Editing

Tools

The editor I pick is Shotcut.
There are only 2 reasons for that - ease of use and free!

The version I pick is the 64-bit Windows portable. (Download here).
You might choose the one that fits your own setting.

Setup (00:53 - 01:56 of video)

To use the program, simply extract the downloads to your destination drive.
Get into the Shotcut folder and double click the "Shotcut" exe file.

When you get into Shotcut, you will see a blank interface.
The first thing to do is adding a timeline (see  02:54 - 03:43 of video)


Basic Principles

I am talking about the fancy effects here.
Simply learn the hotkey to
1) move along the playhead (cursor of timeline) (forward, pause, rewind)
2) cut (called "split" in Shotcut) and ripple delete (delete part of the clip and snap the following one to the previous clip)
3) transition (from one clip to another)
4) change clip speed (make the video faster or slower, applicable to audio as well)
and do
5) picture in picture (PIP, that means, put an image/video on top of another video track)

The details are shown in the YouTube video below.


Conclusion

If you used other editor before, you might notice the lack of keyframming feature in Shotcut.
It's the major disadvantage of this little giant.
But still, I like the hotkey and ability to add effects (filters) with simple CSS and HTML.
Shotcut might not be suitable for big projects though.

Anyhow, It's a good starting point to learn video editing.

Forza! 

Disclaimer:  All features are applicable to my setup which might not function the same in your cases.  Use at your own risk.

Wednesday, July 26, 2017

Install OpenCV on Python 3.6 in Virtual Environment

Step1 - Downloaded The Wheel File (whl file)

In this case, my downloaded whl file "opencv_python-3.2.0-cp36-cp36m-win_amd64.whl" is in my folder "Downloads" inside "F" drive

Step 2 - Activate Virtual Environment

If you haven't setup a virtual environment, please follow along the following video
(00:09 sec - 00:17 sec) to install virtualenv
and
(00:18 sec - 01:16 sec) to virtual environment setup

https://www.facebook.com/clueple/videos/1930124850534185/

Go to the virtual environment that you want to use the whl file
In this case, my virtual environment "testGraphics" inside
folder "graphics" in "F" drive.

Go to "F" drive (if you're from default C drive,
simply type "F:"; if you're already in "F" drive,
type "cd \" to get back to the top directory of "F" drive

Activate your virtual environment with the script below:

.\graphics\testGraphics\Scripts\activate.bat

where "graphics" is the folder that holds the virtual environment
and "testGraphics" is the virtual environment folder

Step 3 - Get to the Whl File Location

Once you've activated the virtual environment ("testGraphics"),
go to the file location that your downloaded whl file sits:

In this case, my whl file ("opencv_python-3.2.0-cp36-cp36m-win_amd64.whl")
sits inside folder (F:\Downloads).

Since I am in F drive already, I simply type:
cd Downloads
to get to the "F:\Downloads" folder

Step 4 - Pip Install The whl File And Import Package

Now, you're in F:\Downloads folder.
Type the code below to install the whl file:

pip install "opencv_python-3.2.0-cp36-cp36m-win_amd64.whl"
(hit [enter])

You're ready to use the new Python package

Step 4 (Optional) - To use openCV in Python 3,
you need to import the following:

import cv2
import matplotlib
import numpy

Hope it helps.

Feel free to discuss here:

www.facebook.com/clueple

Pip Install OpenCV in Python 3 virtual environment

P.S. I just shoot a video on how to install OpenCV in Python 3.6 virtual environment (Windows 7)
The steps are more or less the same


Saturday, July 22, 2017

Record Screen From Other PC | Capture Card Avermedia C875 LGP Method

Intro

My desktop (name it "deskA") can't run certain programs that I target to capture.
But that program can be run on my laptop (name it "lapB") .

Therefore, I decide to play the program on "lapB" and mirror everything there to "deskA"
To do this I prepare the following hardware route:

1) "lapB"(laptop) - running the program
1.1) HDMI male-to-male cable 

2) capture card - take in what's done in on "lapB" via the HDMI-in
2.1) capture card (micro-usb 2.0 out to "deskA" (desktop))

3) "deskA" - turn on the recording program to record everything
passed through the capture card in (2)

Step-by-Step Instruction

Step 1 - Install capture card to your recording PC ("deskA")

In my case, I have a legacy capture card, Avermedia C875 (LGP) that can record up to 1080p @60fps.

1.1)Plug the usb cable (given along with your capture card) to "deskA" .
1.2)Switch to the PC mode (in this case, the blue light indicates PC mode is on whereas red light
signals PC-free mode is on) 
1.3) Go download the driver at the following site (depends on your capture card)
https://www.avermedia.com/gaming/download/live_gamer_portable
1.4) download ALL the drivers and then follow the installation (basically double click the firmware and follow along the installation process)

Now, you're done and you're in PC mode (that means your PC ("deskA") will be able to take in video and audio signal via the capture card.
What you'll see is the capture card with Blue light on (fixed no flashing blue light)


That capture card is hooked up to "deskA" (your recording machine) via micro-USB cable like below


Since we're going to capture what's done from another computer ("lapB"), we need to setup
our capture card to capture "Other PC"

Step 2 - Hookup your video source (e.g. "lapB") to the capture card

Before that, you need to hookup your video source device (e.g. "lapB") to the capture card's via HDMI.  It'll be like this:


At that point, you're hooking up the machine like this:

Recording PC ("deskA") -> micro-USB -> capture card -> HDMI(in) -> Video Source (e.g. "lapB" HDMI(out))

Step 3 - Setup capture card on recording PC ("deskA") to grab video 

Now, go back to "deskA".

Turn on the setup program (in our case, the RECentral),
Click the "Wizard" and go to "Platform", select "Other PC" like below

This means "asking "deskA" to get signal from "Other PC", which is "lapB" that we just hooked up".

Click "Video Source" and you'll see what's playing on "lapB" like below:
If you're playing game or YouTube, whatever, then, you'll see them in "deskA" also.
Remember, the above screen is on "deskA".

Then move on to "Audio Source" and you'll see below:

At this stage, your "deskA" (recording PC) is ready to capture both video and audio from
"lapB" (video source PC).

But, things get tricky here.

Normally, you "lapB" (laptop) won't be playing sound from the capture card
(you'll only hook up the capture card to your laptop ONLY WHEN YOU NEED TO RECORD)

So, we need to jump to step 4

Step 4 - Route the video source PC's audio ("lapB") to play through capture card

You're now back to your video source ("lapB" laptop that you want to capture)

Normally, you play your audio with the default speaker.
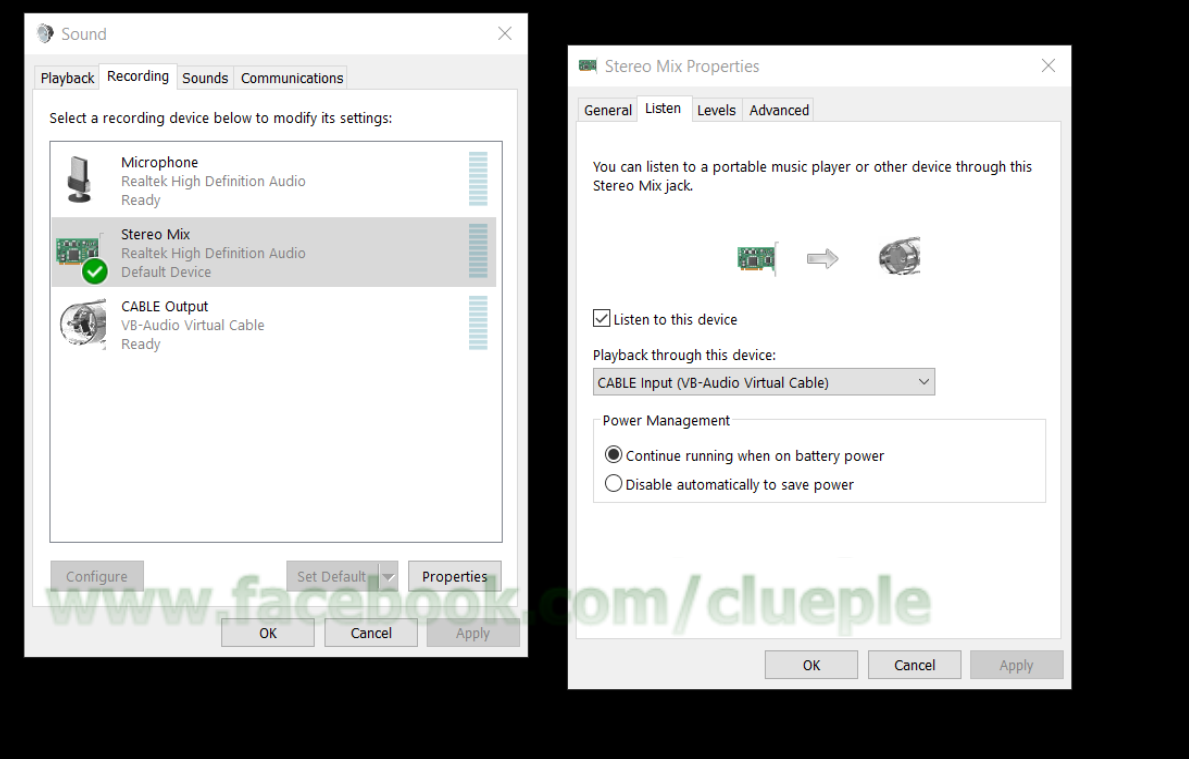
First of all, from your laptop ("lapB"), move your cursor to the "speaker" icon and then "right click" it.

Then, click the "Recording Device" tab.
Your default audio recording device (which in my case, the default speaker) has a green "tick" beside.

Double click the default device (e.g. the default speaker) icon and you can select "listen to"
devices (like the right hand side of the above image)

"Tick" the "listen-to device" and select your capture card (e.g. Avermedia C875 capture card) like below


Now, both the video and audio you play on "lapB" will be streamed to "deskA"

Step 4 - Record on "deskA"


Go back to "deskA" and start recording:

At this stage, you have 2 options:
1) Use the capture card's software (e.g. RECentral) to record to "deskA"
OR
2) Use other recording software to record the "screen being streammed from "lapB" to "deskA")

I prefer the route (2) because I can use software like OBS Studio (download here) to add overlay and other tweaking on my video rather than purely recording the raw screen being streamed from "lapB".
Again, this is a personal preference.
Do whatever you see fit.


Final Note

The way of capturing other PC from one PC is called "Dual PC setup".

It's mainly adopted in gaming on legacy PC.
Let's say if I want to game on my more advanced laptop ("lapB") but I don't want to push too hard
to it.  Then I will record my laptop with another desktop ("deskA").

Of cause it might seem costly but if, in my case, I got an extra legacy desktop and capture card,
I could use the dual PC setup to capture much better video and audio.

Hope it helps.