Intro
My desktop (name it "deskA") can't run certain programs that I target to capture.
But that program can be run on my laptop (name it "lapB") .
Therefore, I decide to play the program on "lapB" and mirror everything there to "deskA"
To do this I prepare the following hardware route:
1) "lapB"(laptop) - running the program
1.1) HDMI male-to-male cable
2) capture card - take in what's done in on "lapB" via the HDMI-in
2.1) capture card (micro-usb 2.0 out to "deskA" (desktop))
3) "deskA" - turn on the recording program to record everything
passed through the capture card in (2)
Step-by-Step Instruction
Step 1 - Install capture card to your recording PC ("deskA")
In my case, I have a legacy capture card, Avermedia C875 (LGP) that can record up to 1080p @60fps.
1.1)Plug the usb cable (given along with your capture card) to "deskA" .
1.2)Switch to the PC mode (in this case, the blue light indicates PC mode is on whereas red light
signals PC-free mode is on)
1.3) Go download the driver at the following site (depends on your capture card)
https://www.avermedia.com/gaming/download/live_gamer_portable
1.4) download ALL the drivers and then follow the installation (basically double click the firmware and follow along the installation process)
Now, you're done and you're in PC mode (that means your PC ("deskA") will be able to take in video and audio signal via the capture card.
What you'll see is the capture card with Blue light on (fixed no flashing blue light)

That capture card is hooked up to "deskA" (your recording machine) via micro-USB cable like below
Since we're going to capture what's done from another computer ("lapB"), we need to setup
our capture card to capture "Other PC"
Step 2 - Hookup your video source (e.g. "lapB") to the capture card
Before that, you need to hookup your video source device (e.g. "lapB") to the capture card's via HDMI. It'll be like this:
At that point, you're hooking up the machine like this:
Recording PC ("deskA") -> micro-USB -> capture card -> HDMI(in) -> Video Source (e.g. "lapB" HDMI(out))
Step 3 - Setup capture card on recording PC ("deskA") to grab video
Now, go back to "deskA".
Turn on the setup program (in our case, the RECentral),
Click the "Wizard" and go to "Platform", select "Other PC" like below
This means "asking "deskA" to get signal from "Other PC", which is "lapB" that we just hooked up".
Click "Video Source" and you'll see what's playing on "lapB" like below:
If you're playing game or YouTube, whatever, then, you'll see them in "deskA" also.
Remember, the above screen is on "deskA".
Then move on to "Audio Source" and you'll see below:
At this stage, your "deskA" (recording PC) is ready to capture both video and audio from
"lapB" (video source PC).
But, things get tricky here.
Normally, you "lapB" (laptop) won't be playing sound from the capture card
(you'll only hook up the capture card to your laptop ONLY WHEN YOU NEED TO RECORD)
So, we need to jump to step 4
Step 4 - Route the video source PC's audio ("lapB") to play through capture card
You're now back to your video source ("lapB" laptop that you want to capture)
Normally, you play your audio with the default speaker.
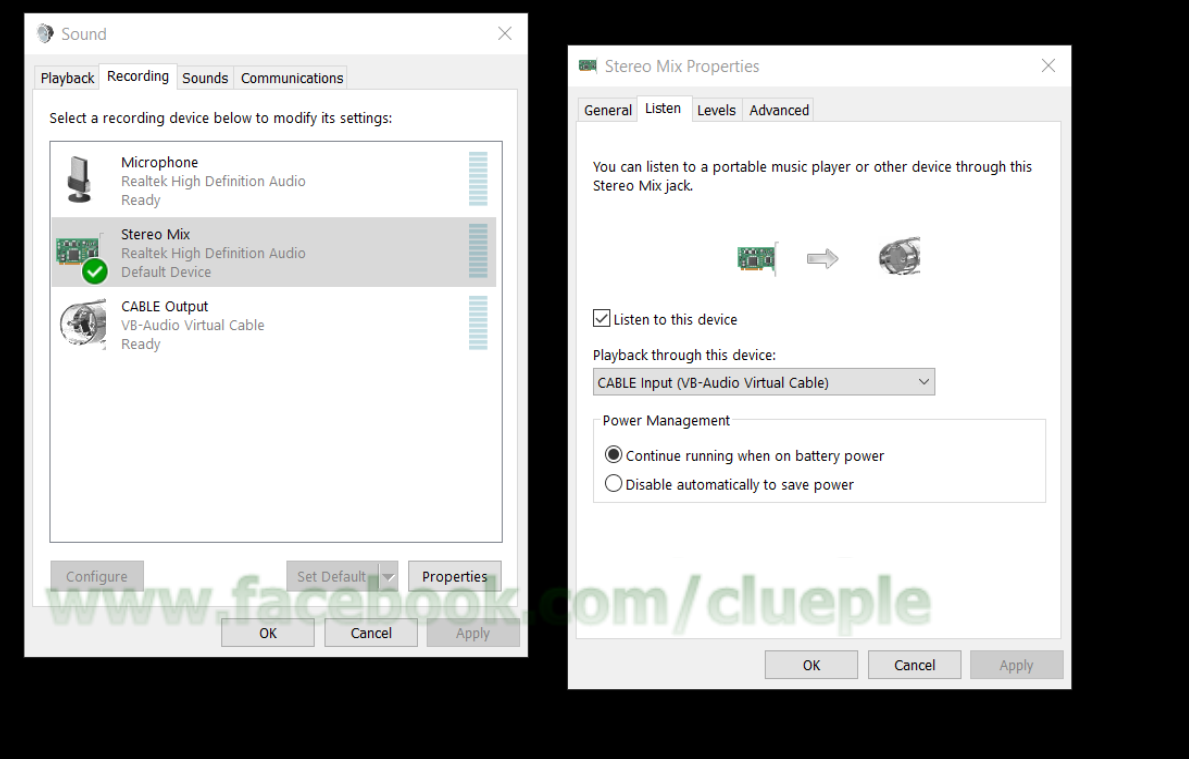
First of all, from your laptop ("lapB"), move your cursor to the "speaker" icon and then "right click" it.
Then, click the "Recording Device" tab.
Your default audio recording device (which in my case, the default speaker) has a green "tick" beside.
Double click the default device (e.g. the default speaker) icon and you can select "listen to"
devices (like the right hand side of the above image)
"Tick" the "listen-to device" and select your capture card (e.g. Avermedia C875 capture card) like below
Now, both the video and audio you play on "lapB" will be streamed to "deskA"
Step 4 - Record on "deskA"
Go back to "deskA" and start recording:
At this stage, you have 2 options:
1) Use the capture card's software (e.g. RECentral) to record to "deskA"
OR
2) Use other recording software to record the "screen being streammed from "lapB" to "deskA")
I prefer the route (2) because I can use software like OBS Studio (
download here) to add overlay and other tweaking on my video rather than purely recording the raw screen being streamed from "lapB".
Again, this is a personal preference.
Do whatever you see fit.
Final Note
The way of capturing other PC from one PC is called "Dual PC setup".
It's mainly adopted in gaming on legacy PC.
Let's say if I want to game on my more advanced laptop ("lapB") but I don't want to push too hard
to it. Then I will record my laptop with another desktop ("deskA").
Of cause it might seem costly but if, in my case, I got an extra legacy desktop and capture card,
I could use the dual PC setup to capture much better video and audio.
Hope it helps.